
I will be pleased if you subscribe to my Instagram (instagram.com/uptime.lab) and Twitter (twitter.com/Merocle). I do not post any spam — only my own projects and quite rarely. Your subscription is essential to me!
If you’re wondering how it can be used and why, please look at the introduction in the first article: Raspberry Pi Rack Server Mark I.
Raspberry Pi Rack Server Mark I and Mark II have been working pretty nice for 6 months already. They are based on a model that I found on thingiverse.com and inherited the basic design idea.
With Mark III, I completely rethought the design, which allowed to:
- increase the number of raspberries in 2 rack units
- significantly reduce printing time and plastic consumption
- significantly reduce the time required for assembling and disassembling the server
- reduce the number of parts
- implement a modular design, which means that MARK III will be available in various modifications
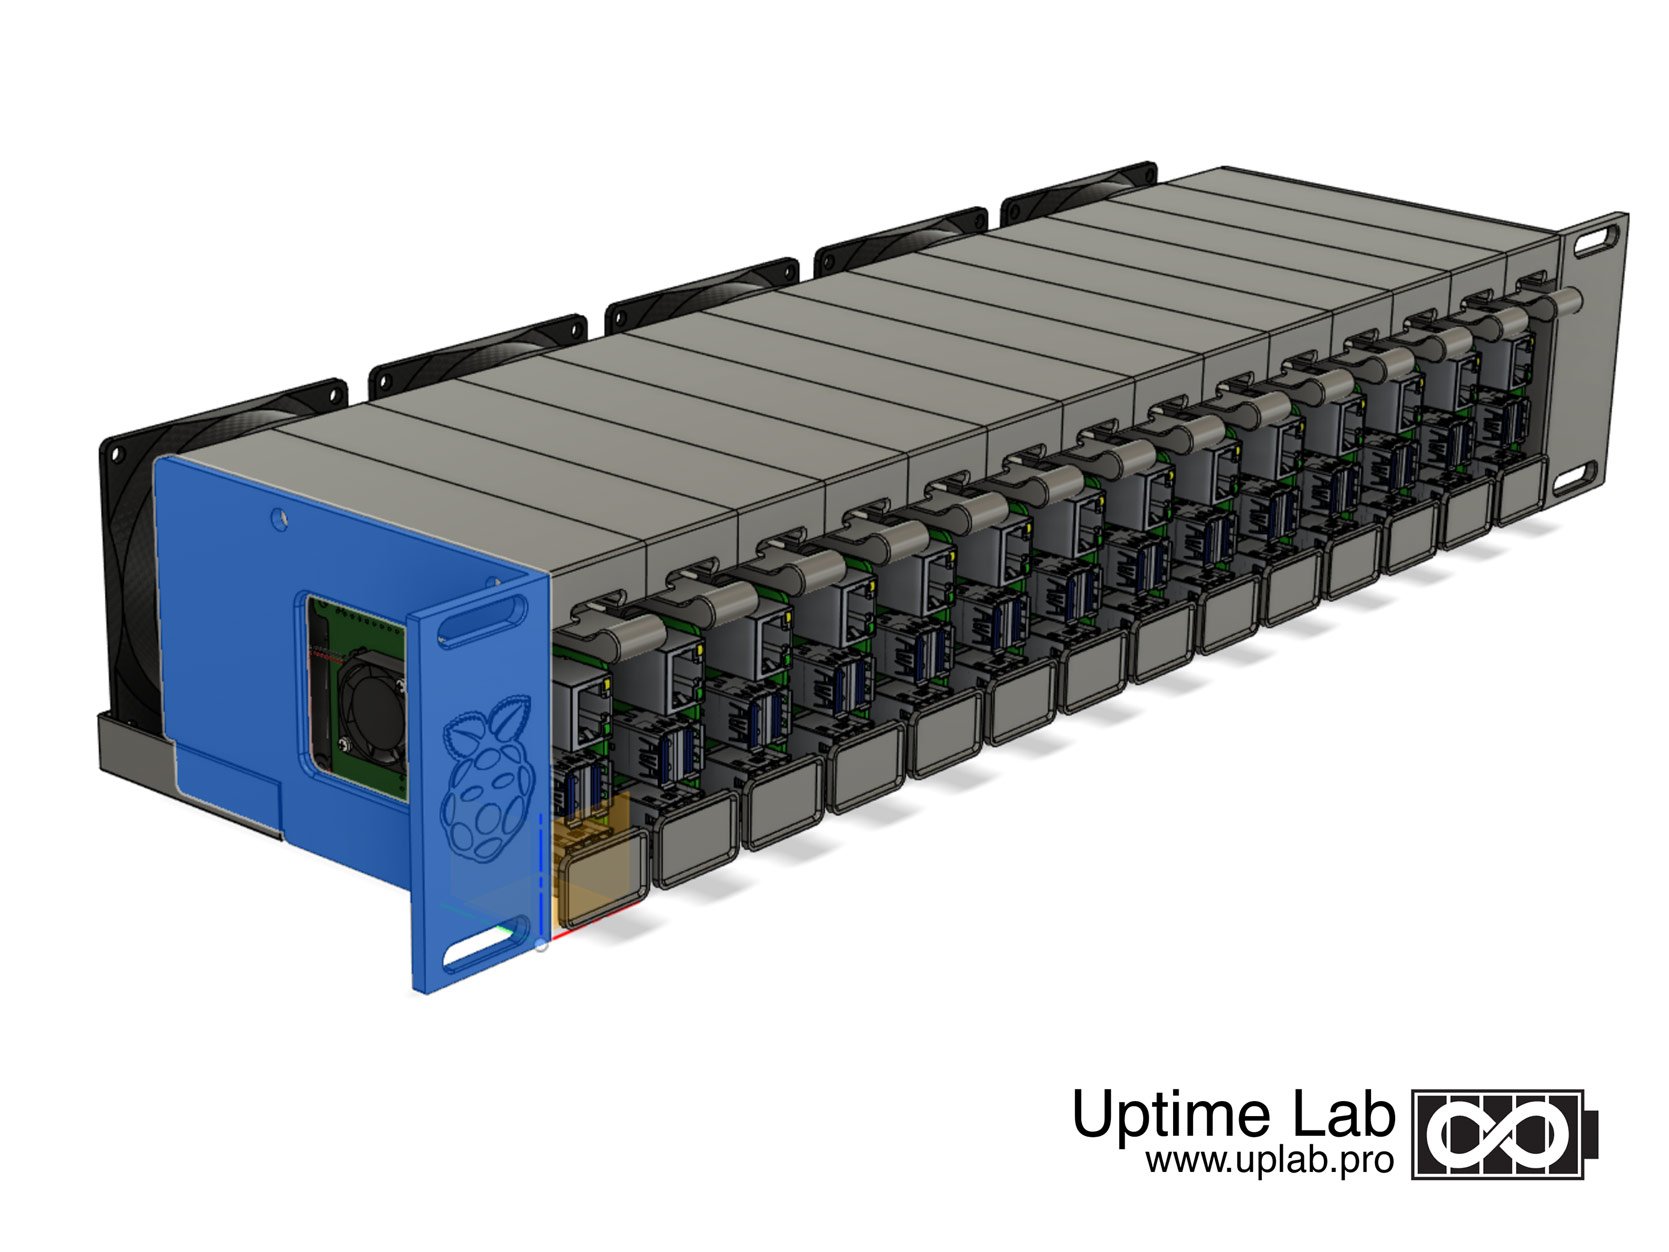
The basic model, designed for 14x of Raspberry Pi and 14x of a standard 2.5″ SSD


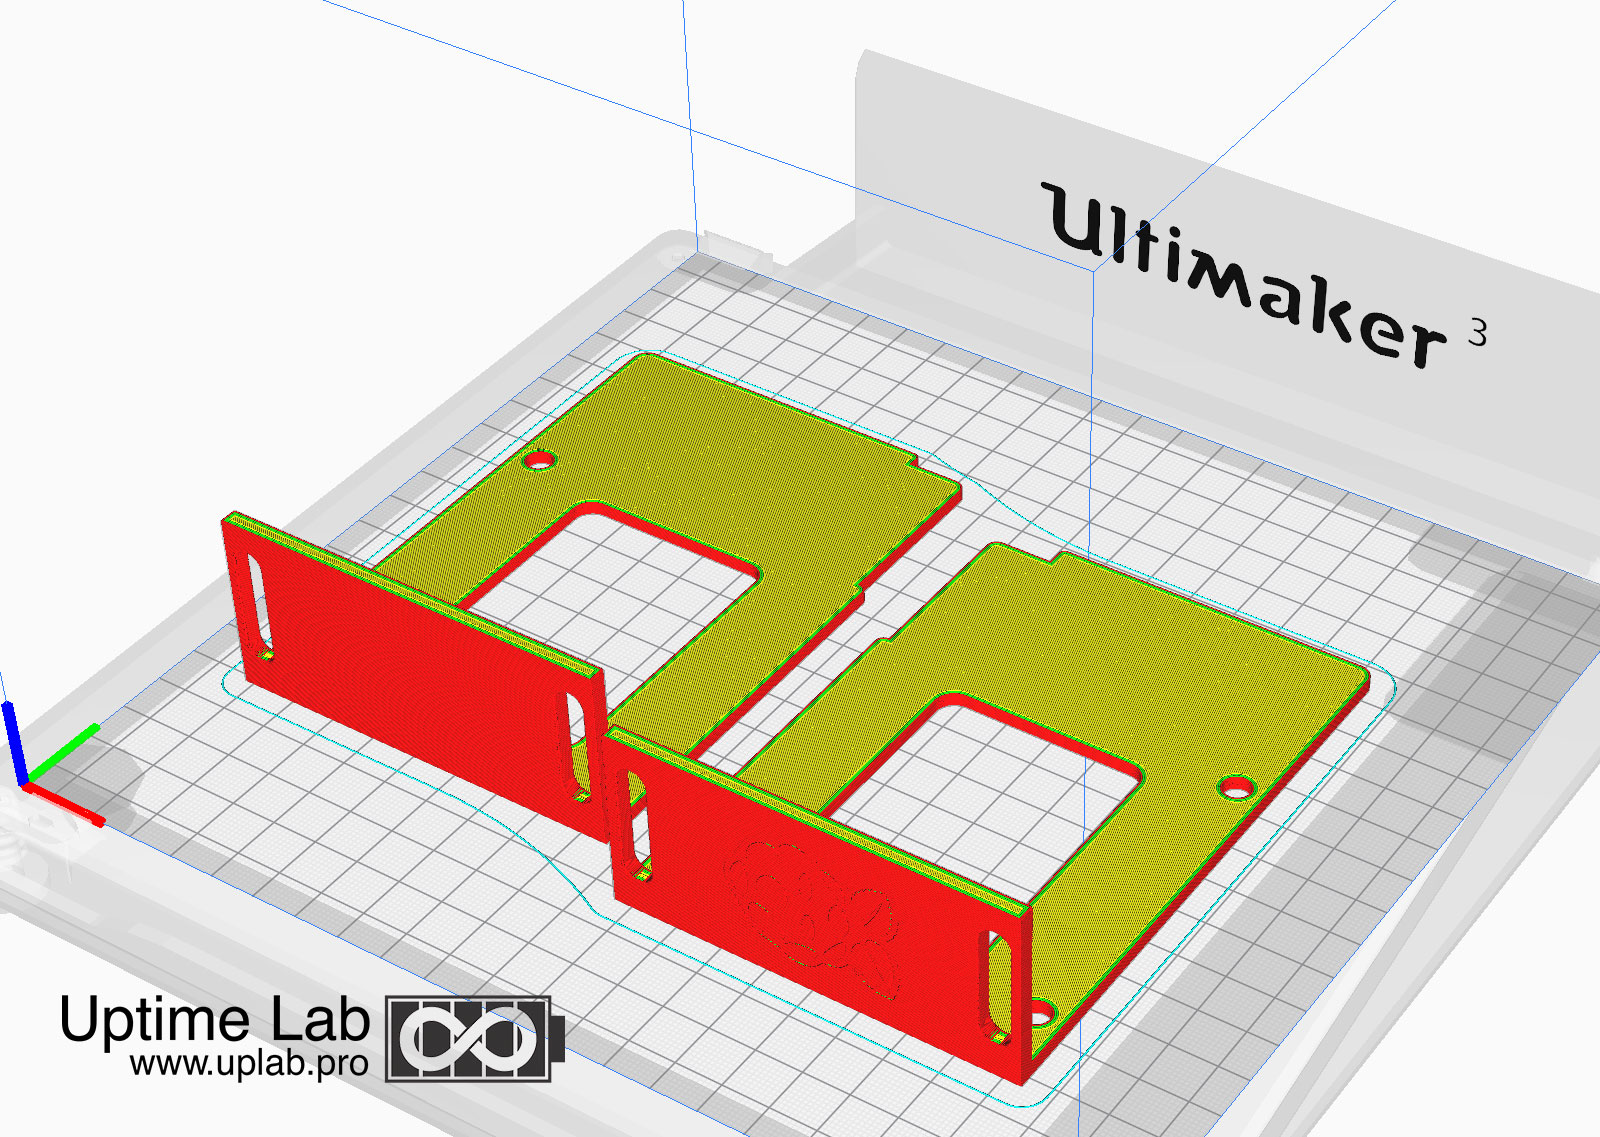


Printing recommendations:
- layer height 0.15mm
- wall thickness 0.6mm
- no supports
- horizontal expansion -0.1mm
- without a skirt
Please print one Tray and one Body part first and have a look at how they fit each other, as well as how it works with Raspberry Pi and your SSD.
Screws and other parts:
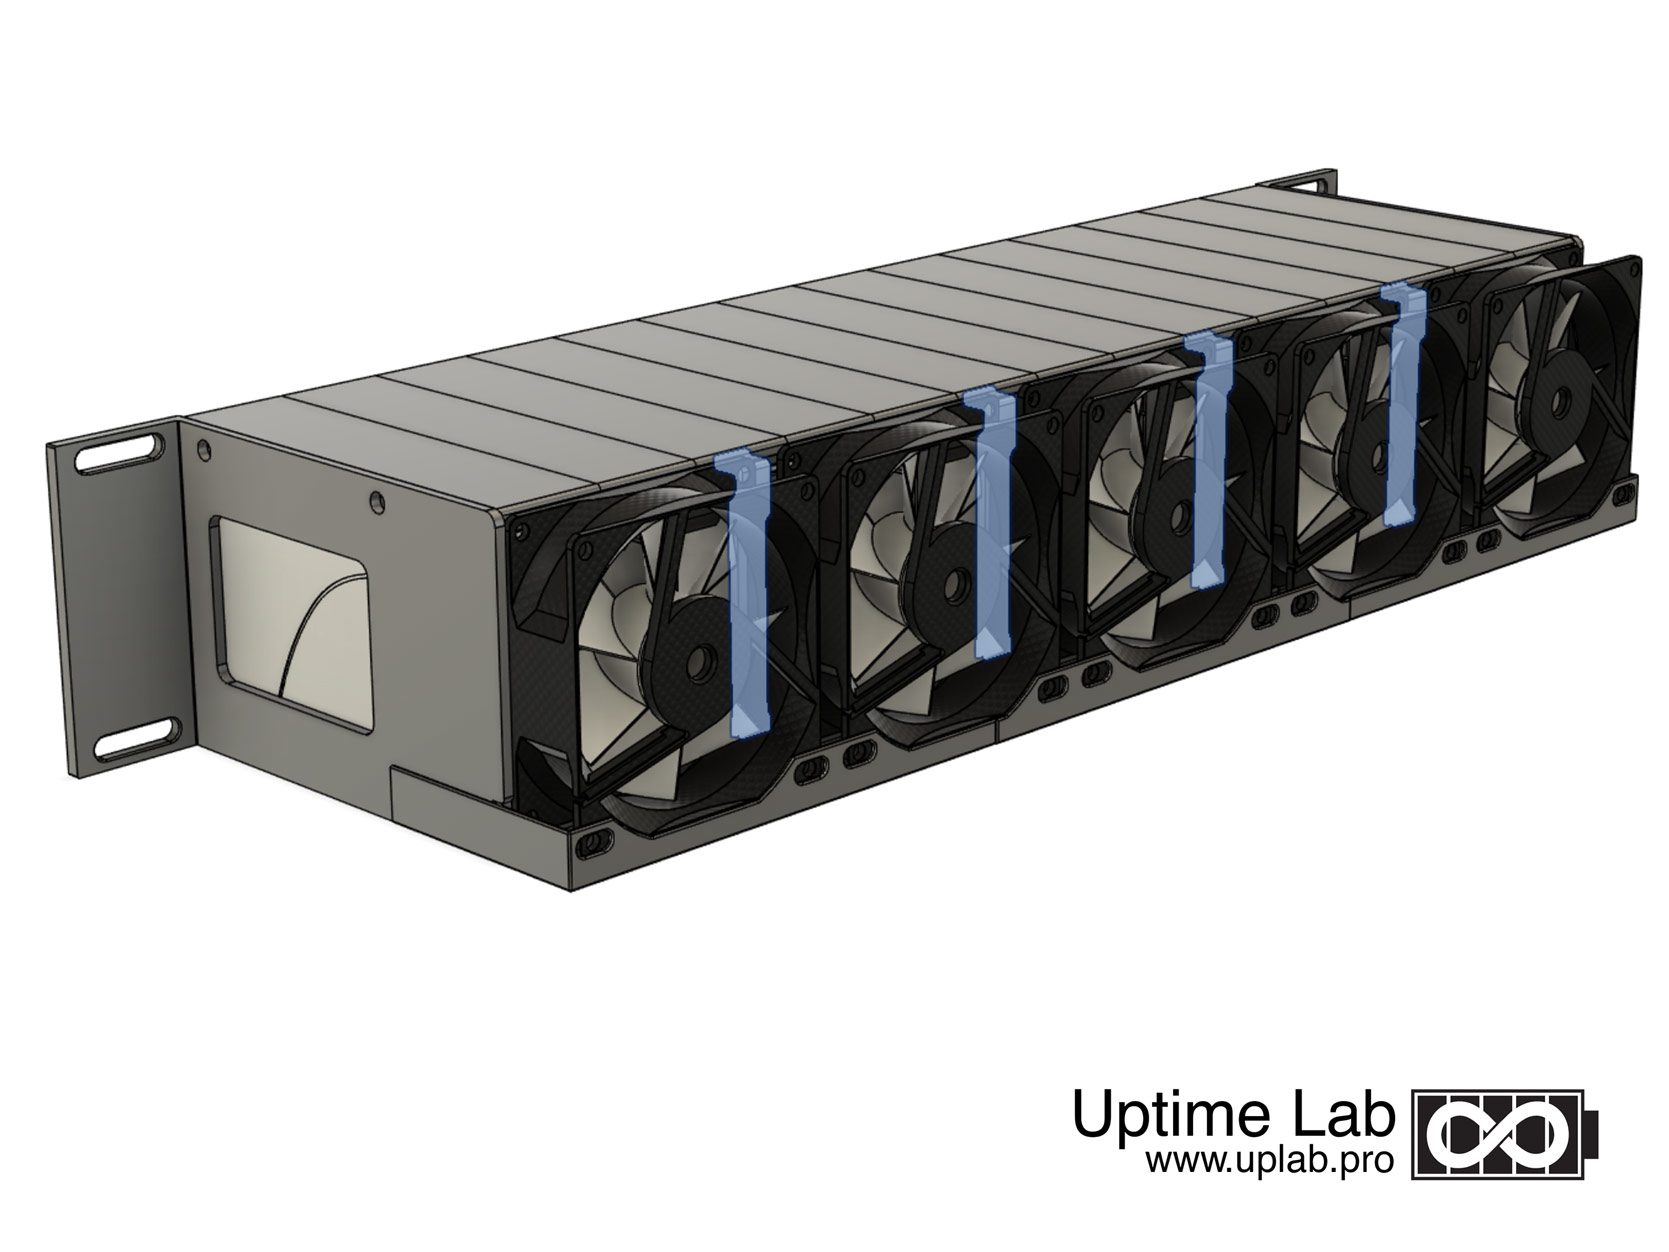
- Set of 5 fans Arctic F8 Value Pack, ACFAN0 0061 A – €17.60 incl. VAT
- Power supply for fans 12V2A 7Tipps – EUR 13.99 incl. VAT
- Adapter with 1 to 6 fans. Cutting off the extra one turns out perfect for my purposes Lüfter Adapterkabel 3Pin auf 6x 3Pin Molex (6x15cm) – €4.40 incl. VAT
- Screws for fans M4 12mm 10 pcs. with nuts
- Threaded rod M5 ~452mm 2 pcs. and 4pcs nuts M5
- 20 screws for fans for plastic (usually come with fans) Like that StarTech.com PC Case Fan Screws (Pack of 50)
- In case you don’t use original PoE hat you additionally need 2x M2.5 with M2.5 nut for each Raspberry
- 2pcs. M3 ~5mm for each SSD. Like Poppstar Hard Drive Screws for 3.5 Inch or 2.5 Inch Hard Drives Set of 50
- SATA Cable Adapter, USB 3.0 to SSD (you don’t need model faster). Like Sabrent SATA Cable Adapter, USB 3.0 to SSD / 2.5-inch SATA Hard Drive Adapter UPD: according to this article, this adapter may not work with Raspberry. UPD2: Carl recommends to update adapter firmware from this link
If you like what I do, you can always support me with PayPal:
Model for 18 Raspberries without SSD. Works with or without PoE hats
- Shorter
- Lighter
- Active cooling highly recommended


Printing recommendations:
- layer height 0.15mm
- wall thickness is 0.6mm
- no supports
- horizontal expansion -0.1mm
- without a skirt
Please print one Tray and one Body part first and have a look at how they fit each other. In case of problem play with “horizontal expansion”.
Screws and other parts:
- Set of 5 fans Arctic F8 Value Pack, ACFAN0 0061 A – €17.60 incl. VAT
- Power supply for fans 12V2A 7Tipps – EUR 13.99 incl. VAT
- Adapter with 1 to 6 fans. Cutting off the extra male and female sockets works perfects Lüfter Adapterkabel 3Pin auf 6x 3Pin Molex (6x15cm) – €4.40 incl. VAT
- Screws for fans M4 12mm 10 pcs. with nuts
- Threaded rod M5 ~452mm 2 pcs. and 4pcs nuts M5
- In case you don’t use the original PoE hat you additionally need 2x M2.5 with M2.5 nut for each Raspberry
If you like what I do, you can always support me with PayPal:
Model for 12 Raspberries with Samsung T5 SSD. Works with or without PoE hats
- Completely repeats the functionality of Mark II
- Shorter
- Lighter
- Active cooling highly recommended


Printing recommendations:
- layer height 0.15mm
- wall thickness is 0.6mm
- no supports
- horizontal expansion -0.1mm
- without a skirt
Please print one Tray and one Body part first and have a look at how they fit each other. In case of problem play with “horizontal expansion”.
Screws and other parts:
- Set of 5 fans Arctic F8 Value Pack, ACFAN0 0061 A – €17.60 incl. VAT
- Power supply for fans 12V2A 7Tipps – EUR 13.99 incl. VAT
- Adapter with 1 to 6 fans. Cutting off the extra male and female sockets works perfects Lüfter Adapterkabel 3Pin auf 6x 3Pin Molex (6x15cm) – €4.40 incl. VAT
- Screws for fans M4 12mm 10 pcs. with nuts
- Screws for T5 SSDs, M3x8 (or more) 24 pcs. with or without nuts (holes in plastic allows you don’t use nuts)
- Threaded rod M5 ~452mm 2 pcs. and 4pcs nuts M5
- In case you don’t use the original PoE hat you additionally need 2x M2.5 with M2.5 nut for each Raspberry
If you like what I do, you can always support me with PayPal:


I’m Head of Hardware in JetBrains company. Uptime Lab founder. I’m glad to see you on my website! I hope you find my content useful. Please subscribe to my Instagram and Twitter. I post the newest updates there.
Looks great, have been waiting for the files for this!
Thank you! unfortunately writing articles and documentation is my weak point)
I’ve been living that problem.
So say we all!
Looking good! Are there advantages of switching to M.2 SSD?
How many Pi can you fit in 2U? 14 isn’t the max, is it?
Thanks! I don’t think so. The speed mostly limited by USB 3.0 on Raspberry. In my experience the fastest option is Samsung T5 drives. I will make adapters for them for MARK III also.
Perhaps the optimal option would be to use Raspberry with mSATA SSD (and USB 3.0 adapter). They are fast and cheap.
As you can see from render in article there will be modification for 18 Raspberry (without SSD)
Looking forward to the version without SSDs! Would also like to see a mod for with the sides fully enclosed for best temps – particularly for smaller bramble type use cases (4-8 PI’s).
Love the update.. I was having issues printing some of the longer panels on the previous one.
Just love there is still enough room for POE
Thank you! I’ll share additional photos and printing tips today
Hi,
Great job.
I would like to adapt it to add an LCD screen.
What software do you use?
Would it be possible to get the sources?
Hello!
Thank you!
Just interesting, why do you need it?
I use Fusion 360.
I don’t want to share sources at the moment. But maybe later will do that. But if you want I can do modification for LCD screen for you, and will share as option for Mark III 🙂
If possible, could you please check if you can adapt it to hold an “OLED SSD1306 Display I2C IIC 128×32 0.91 4 pin” more details about it in my github
https://github.com/f616/raspberrypi_oled_stats
Any chance you are at the point where you would be willing to share the source files?
Now this looks awesome! Any chance you could you do an attachment for Intel NUC?
I current have my own 3D printed version where I have 10 Pis and 1 Intel NUC 10 Tall version .. but nothing nearly as modular as this.
NUC is pretty big, right? I have one project for mac mini, it could fit. But at the moment we store them (mac mini) in rack shelf, and that’s no so bad )
True and probably a not that common case to mix Pis and NUC to the same, but I have a pretty small self built rack cabinet and not much space left .. so I kinda need to be able to mix them to the same .. had some modules for USB power supplies also earlier, before adding PoE to the Pi’s.
Anyway NUC is 11.7cm wide, 5.1cm tall and depth is 11.2cm. So it could fit in horizontally in 2U, though probably would eat up about 4 of those raspberry pi slots .. but I could still sqeeze in 2 more Pi’s.
Maybe I’ll just play with the attachments a bit and see if I can get something that works for my NUC.
This is awesome! Exactly what I was looking for. Definitely following your projects.
Thank you! I am very glad that my design helps you! pay attention, in this version ssd is not thicker than ~7.5 mm.
Hi, I have v1.0 (UPTIME Raspberry Pi Platform pi14ssd (v1.0)) and am now starting to populate it, what has changed between that and v.12 above? Will the trays fit in the older version? Cheers.
no, there the size of the entire model has been slightly changed and new options for brackets have been added.
Rails are not affected
But I strongly advise you to print the test. Different printers print differently and adjustments may need to be made (horizontal extension setting)
I’ve seen that somewhere…
https://www.thingiverse.com/thing:1606631
Great upgrade guys, I designed the one in the link back in 2016 for a project at the time.
Mark I and II based on that, as I wrote
Mark III completely new one 🙂
Very cool! Thank you!
Thank you! )
I got excited and was thinking about building this but then realized, I don’t need a cluster of raspberries. What I would like to see(and I was looking for official measurements to make it) is a disk array enclosure that I can connect with a sata hub, using this design as a starting point. (Thanks)
Are there any plans on upgrading this with an internal switch board and internal power distribution? Otherwise you are waisting another U of the rack for something that is directly integrateable.
I thought about it. I think you will agree that making a switch comparable in functionality, reliability, and security with Cisco or HP is quite difficult 🙂
We use them with old HP 5120 (you can buy used for ~200 euro from eBay), which can give up to 370W power, has SNMP for monitoring (we use Prometheus and Grafana) and you can restart remotely any port you want. And It has 48 ports with PoE.
Any thought of going “diskless” and using either PXEboot or solely relying on the onboard microSD for boot, but talking to a NAS/SAN? I’m thinking tightly coupled numerical modeling, e/g/, weather models, so the SSD doesn’t add much for me. This design looks ideal for a Container implementation, and that’s something also likely on my radar, for a ham radio/weather server implementation.
A friend of mine is working on a PXE boot option for agents at the moment. Our tasks need about 70Gb of fast storage, so the design without disks doesn’t work.
P.S. We don’t use microSD and boot directly from USB.
Thank you! I’ll be interested to see that. I hope to continue with my weather modeling and want to try on the Pisafter I retire next year. Initial thought is 64 RPi, and build out a rather speedy file system, perhaps BTRFS but not Gluster, to run a relatively tightly coupled numerical weather model like WRF. I’ll ramp up CPUs if it can’t run fast enough to be useful. Love your design.
Neat job! I wonder how well this would do as a Ceph cluster w/ one OSD per pi.. even tho the I/O speed is somewhat limited by USB you can make up for it with lots of nodes.. Imagine a production level fully redundant ceph cluster in 6u (28 pi and 2.switches)! What do you all think?
We have 36 Raspberry in 7 units with one switch )
if your tasks are not big, then everything will be fine, but if you need more than 8GB of RAM or 4 cores, then performance will be additionally limited by the network
Would you consider sharing the model files as well? I would love to adapt the holders for some other smaller devices like a Netgear 5 port switch, Arduino’s etc.
Would love to see a 1u version for less pis:)
Why does everyone always want things for less. This is a custom piece and not from a factory pumping these out by the millions. Pay the piper or go away.
I think this is just a wish 🙂
From my point of view, just a few raspberries can be placed in 1U. So it is easier and cheaper to buy a 19″ shelf and put 6 devices on it.
I don’t see any advantages from the 3D printed rack in this case.
Just nice view maybe
Thank you for the work on this, will be very useful for a project we have. We are using Samsung T5s, what are the chances of an adapter?
Thank you!
I will definitely make it for T5 because I use them )
Hopefully, in the next couple of weeks.
It will be great to have alternative ssd option like t7 or t5 holder for the tray but good job !
I will make it for T5 because I use them )
can’t recommend you to use T7 – it’s slower with Raspberry, I checked that.
At the moment I’m waiting for parts for a new PC because the current one can’t work with that model 🙂 it’s too complicated and heavy.
This looks absolutely amazing.
As a casual Pi enthusiast (running Pi’s at home for ad blocking and file and print services) So I’m new to the Pi industry.
Wondering two things.
What would one do with 14 Raspberry Pi’s? and,
What would one need with the Samsung T5 ?
Would this be for mining bit coin or surveillance systems or…
What is the height clearance in mm for the pi? I am powering my cluster through the 5v and ground pins and I’m not sure if the jumper cables are too tall or not. Thanks.
Careful, which version of the Sabrent, the 3.0 doesn’t work with usb boot on the pi4b with USB3 ports.
https://jamesachambers.com/raspberry-pi-4-usb-boot-config-guide-for-ssd-flash-drives/
Thank you very much! that is very useful. My adapter works, but according to that article, that just luck
I wonder if they have different sub-models? the packaging listed: EC-SSHD
[687665.543255] usb 5-3.4: new high-speed USB device number 33 using xhci_hcd
[687665.733481] usb 5-3.4: New USB device found, idVendor=152d, idProduct=1561, bcdDevice= 2.04
[687665.733484] usb 5-3.4: New USB device strings: Mfr=1, Product=2, SerialNumber=3
[687665.733486] usb 5-3.4: Product: SABRENT
[687665.733486] usb 5-3.4: Manufacturer: SABRENT
[687665.733487] usb 5-3.4: SerialNumber: DB9876543214E
[687665.734636] scsi host5: uas
[687665.735186] scsi 5:0:0:0: Direct-Access SABRENT 0204 PQ: 0 ANSI: 6
Bus 005 Device 034: ID 152d:1561 JMicron Technology Corp. / JMicron USA Technology Corp. JMS561U two ports SATA 6Gb/s bridge
I do like how small this adapter is with your design, as the Startek ones are a little bigger/tighter around the Ethernet cable.
Regards,
Hey, I just upgraded the firmware for my cables and now they work just fine in USB3.0 mode. Found that from sabrents website.
Where did you find this firmware update? Please link it
Found it, and can confirm that it fixes the issue: https://www.sabrent.com/?wpdmdl=78709&ind=1588706035834
Have you actually tried booting from the Sabrent SATA Cable Adapter with the Rasberry Pi 4? I just cant get it to work and reading some other sites seems to confirm this. To bad i ordered five of them, you might want to update the recommendation to save others from doing the same misstake.
For anyone else coming here for this issue, update the Sabrent firmware and they will work, link is here: https://www.sabrent.com/?wpdmdl=78709&ind=1588706035834
Thank your Carl! looks like my adapter has new firmware.
Hi any chance you have the 18 pi version available as an STL? I’m network booting all my Pis so no need for the SSDs 🙂
Hello Nick! I’m building the new PC for myself at the moment.
I will try to finish the n18 option for this server and share models next week. But I have no chance to check models in real life before February, but pretty sure that everything will be fine. You can contact me directly by e-mail (merocle@yandex.com), and I’ll share EAP with you next week 🙂
What’s your method for attaching the fans to the fan power supply? The power supply is a 12V DC barrel but the fans are 3-pin
Hi! in the “Screws and other parts:” section I give the link to the adapter:
with 1 to 6 fans. Lüfter Adapterkabel 3Pin auf 6x 3Pin Molex (6x15cm) – €4.40 incl. VAT
Cutting off the extra plug (one male and one female) turns out perfect for my purposes. LED – Strip plug comes with the 12V DC. So no additional soldering needed )
Ivan, this is great work. Thank’s for all your efforts. Any tips on getting the trays to snap in and out a bit easier?
Hello Dennis!
Thank you!
I use “horizontal expansion” -0.1
And my things are printed exactly in 3D model size
It seems that the 18 pi rack for body there is some error.
Hello! Could you clarify?
The holes to join together one of the holes located wrongly
Thanks! You’re right. I thought I fixed that but mistaken. Replaced the model.
I know someone asked about the source files and you indicated you were not open to sharing right now. I am not sure if that changed or not. I was hoping to modify it to allow the pi to recess from the mounting rails a couple inches to provide clearance in the front for network cabling, thumbs drives etc.
I am afraid this might put excessive stress on the bracket.
I’ll share the sources later. After I made the Mark IV prototype. But you can contact me by email(merocle@yandex.com) or telegram (ASCII) and describe your idea. And maybe I’ll make an exception ) if you promise not to share it
I think this would be a great addition, I also found if the RPi was a little further recessed you would have better access to pulling it out with the grip/lever. Cables has been a slight problem with a glass from server rack.
you may need to rebuild the cabinet with more space for wiring if possible? Because with glass can be a problem with ventilation as well.
I have purchased a pack of the same fan but with PWM capability here. It was only £4 more than a non PWM version and has a benefit of including PWM sharing capability and chain cables already. So there is no need to purchase separate cables or adapters.
As it has PWM I’m planning to use 12V FAN controller board with temperature probe (something like this or this or alternatively build RPI pico based solution).
great idea! I just tried to keep it as simple as possible) and decided that I don’t need the ability to control the speed of fans in the server room.
i’m not really following how the fans attach to the body of the unit. Do you have more pictures that show that? I’ve got it all printed in front of me…
managed to figure it out – threading those nuts through the rivet required a level of patience i wasn’t sure i had… end result looks super great! Thanks so much for putting this together.
My use case: run k3s HA and use rook to deploy a ceph cluster to provide storage to another k8s cluster. It works pretty well – did some general perf testing with only 3 pis and I suspect perf will get better as I add more (at 7 now, waiting for nand prices to drop before adding more)
glad to hear! 🙂
Hi Ivan, I stumbled upon your design when searching for a rack to hold 12 raspberry pies for my 3d printer farm so that I can run Octofarm. I always try to 3d print things whenever possible and I think your rack mountable design is perfect for this. I have 12 Prusas MK3s and I was wondering if you can advise me as to which version of your design (MARK) is best for my project since I don’t think I need SSDs but I’m not sure about the individual fans on each pie, or the fans in the back. Please let me know your suggestion, it will be really helpful, thank you.
Hello! this one (MARK III) is the last one, and I think the best. you can use the model for 18Pi because it’s lighter and easier to print. I think better to use it with fans, but you can have a look without, maybe your load not too big.
Hi Ivan
Great job on the designs! can’t wait to see mk-IV
Did you ever get around to designing a T5 bracket for this model?
Thanks again for all your hard work!
Added 🙂
Have to update the whole model for T5. It will be for 12 Pi, but shorter and lighter than the version for 2.5″ SSD.
Hello Joe!
Thank you very much!
I have one sketch for T5, but didn’t print it yet. I’ll try)
I’ve printed it, and it works so well. Thanks for sharing this, I tried a similar concept, but I am no where near as talented and was giving up on having storage in the rack too.
I want to try and fit some Rock Pi Xs (https://wiki.radxa.com/RockpiX) in as well. The only problem is the bios chip and JTAG port on the rear of the Rock Pi X clash with the tray, so I had to cut part of it off to get it to fit. Would you consider releasing the tray file, so I can change the support?
Hello Adam! Thank you very much! I plan to make this project open-source soon and share it on GitHub. I want to double-check licenses first and prepare files a bit
Hi Ivan.
Thanks for your great work. I am having a great time printing and setting up my own RPI blade using the “Model for 12 Raspberries with Samsung T5 SSD. Works with or without PoE hats” design.
I use a 10″ small floor rack cabinet (does not take up that much place in my office :))
For disks I brought the Samsung T7 500KB SSD (what I could find at my local online webshops). But they work fine.
I have some suggestions on improvements/changes:
Since I use a small 10″ rack with fixed rails positions I cannot close the front door at the moment due to the fact that your left and right rack brackets have a fixed position. How about making a long rectangle (like on the front side of the brackets) so the whole body set can be put deeper into the rack ?
What about extending the Tray (where the RPI is placed on). And on the extension (behind the RPI put the Sansung SSD ? The reason I suggest it is the each PI’s CPU (I am using the Pi POE hat with has a fan over the CPU)’s fan just blows right into the SSD – not very effective cooling flow IMHO.
Also, are those big 80mm fans you use for the back really needed. I suggest extending the Tray up to 50mm and using 1 50mm fan for each tray with a RPI+SSD. That could even be installed on each tray so it would be completly autonomeus 🙂
What about (thin) wall seperation between each blade? To make sure cooling flow goes in front, direct over the RPI and SSD and out in the back.
Finally. I have single USB-2-TTL cable I use for debugging failed kernel compilations 😀 and PXE boots etc. I plan to buy cables for each RPI and it cound be neat to have a USB holder for that cable so I could just plug me into a RPI on the front.
(Its been around 20 years since I last worked with AutoCAD / 3D drawings, but would you interesting in sharing your 3D draw files? Would be easier to show suggestions… )
Keep up the great work!
BR,
Bjarne
Hello Bjarne!
Thank you so much for such a great comment with a lot of interesting ideas!
At the moment I concentrated on my CM4 platform (should make article). So I have no time to testing and design Mark III mods 🙁
But I decided to make Mark III open-source in case the CM4 blade prototype successful. Right now I do tests, and everything looks awesome. So hope to share all the files on GitHub soon
Hi! What are the temps like in such a tight space? I know pis run cooler, but I imagine with them so tightly packed they’re high 40s at least
Hello! yes, about 40-50 under load. But that is totally okay, no throttling
It’s 8-9W per Raspberry, so 5 fans can cool it easy
Hi, Ivan! Thanks so much for this beautiful design. I saw that you mentioned a 4 pi version on Hackaday – is this still planned?
Hello, James! Yes, but at the moment am working on my blades and it takes all my time and I have my full-time job as well. Sorry for the long waiting
Hi Ivan,
Just curious what material you used to print? ABS, PETG or PLA?
Hi! I use Ultimaker Tough PLA. It’s very similar to PETG I think
I’m not Ivan but FWIW I printed this in PLA. I am not expecting the parts to be exposed to temps > 60deg C. At least, I hope they aren’t if my fans are spinning. The body pieces are slightly tricky to print – they are narrow pieces have to stand edge on and go up 150ish mm. Whatever material gives you the best adhesion is probably a good choice, especially for those.
Double-check how your printer prints test cube 10x10x10mm. Probably you need to use a horizontal expansion setting (for CURA slicer). I use it with -0.1mm and printed details 1to1 according to 3D model.
Wouldnt that just shrink/grow both the pieces by the same amount and you would end up in the same place? Still not a bad thing to do though… Thanks for the tip.
no, that is not about the model size. It’s about model walls size mostly (sorry for the late reply, hope everything is fine!)
Thanks Ivan, I ended up getting distracted modding and building an enclosure for my prusa, I’ll hopefully get back to it soon!
I printed some test pieces yesterday in PLA but I think due to shrinkage the tray and body won’t go together (they get stuck after about 15mm). I am using a Prusa mk2s, the print quality actually looks pretty good, maybe just need to adjust tolerances.
The same I replied to James 🙂
looks like you need to change printer settings a bit. Check if your slicer support something like “horizontal expansion”
You can print the test cube and check it with a micrometer
Tip for anyone else dealing with freedom units AKA US Imperial – you can use a #10-24 or a #10-32 threaded rod (with the corresponding nuts/washers if desired) instead of the 452mm M5 threaded rod the design calls for. A 36 inch #10-24 zinc plated threaded rod was $2.50 at Home Depot and fits this project well.
Thank you!
thanks for your project.
i have subscribe for PI 4 blade..
Hi Ivan, thanks for the awesome project! Could you please say if this will work with new PoE+ hat, old hat has small cut on the side, which is not presented on a new one.
Without IPMI this toy makes absolutely zero sense.
Is it possible to share the source for the tray? We want to adapt it for another card.
I know I’m late to this article . But I guess this design is timeless 🙂 . I am surprised that I couln’t find any video showing how to fit these components .Please point me towards any guide / Video out there , particularly purpose of middle brackets and short brackets listed in 12 Pi design
Hi! Check the pictures with assembled 3D model. Brackets are just variants for different server racks. You can open the model and have a look. You need only left and right ones from big, small or middle
Hey, really great project. I printed it for an 10 inch rack and had to do some minor adjustment, but nothing to crazy. The only issue i am currently facing are the 2,5″ SATA adapters. I think when you could move the Raspberry Pi mount about 1,5cm back in relation to the 2,5″ Mount, it would greatly improve the compatibility with SATA to USB adapters, especially with some bulkier but often used one, like the StarTech ones.
Hi,
I just printed the mark III and assemble it. One thing that made me puzzled when I compare the image on the webpage and the model I printed is that the fan spacer has just one leg to take a screw from a fan while on the photos it looks that the fans left and right of the spacer fit a screw in it…
I also saw that you have un the back in some pictures a backplate under the fans but there is no such sty file in the version I printed(
UPTIME Raspberry Pi Platform pi12_T5SSD (v1.0_RC1) (aka Raspberry Pi Rack Server Mark III)
Hi Ivan, great to see a lot of works that you have in here. Wondering if you could design a custom board where we can connect multiple rasberry pi or Nvidia Jetson boards which can share the NVMe storage on the base board. Let me know if this is something possible.
Hi Ivan, Just wondered if you had seen this ZimaBoard design based on your ideas?
https://discord.com/channels/884667213326463016/987271556587741204
The link didn’t open for me. From the picture it looks very curious. However, the ventilation can be improved
This is absolutely BRILLIANT! Really awesome design, Ivan! I’m thinking about a fork using a 2U (steel) rack mount shelf and using the extra depth for 2 or 3 ATX power supplies and a PCB that gangs all the 5V rails together for abundant current and redundancy.
Thank you very much!
Good luck with your idea! I’m concentrating on Compute Blade and my main job for now. I hope to get back to this project and help the community with new ideas one day
Hi, I’m in the process of printing this and plan to assemble in in a 10″ rack which has slightly different dimensions.
Does the threaded rod + nuts at ~452mm cleanly slide into a 19inch rack given that the standard 19inch rack opening is 450.85mm? Or do you thread the rod in after you have fitted the assembly in the rack in with the pins?
Hello! There didn’t seem to be any problems with the installation. There were problems with the Mark II. But the Mark III, you can just tilt it up a bit, and it goes in
Cheers, I managed to fit it in on my 10″ with 8 Pi4s in it!
Thank you very much for the design. I ended up printing with -0.05mm horizontal expansions and it fits nice and tight.
Id like to modify this to use m3 5x4mm threaded inserts any chance of the step file for just the tray?
Which PoE hat do you recommend?
Your work is really impressive. I’m thinking to use the Mark II or Mark III to spin-up an 8x Raspberry Pi 5 8 GB Cluster with 8x Pineberry Pi HatDrive! Bottom Hat for NVMe SSD and 8x GeeekPi ICE Tower Cooler (Horizontal variant). Which Material do you recommend to use? Any other sort of suggestion? I’d appreciate pretty much some insight before shipping the files to print! Thanks and keep up the great work 😉
I printed everything but the sleds in PETG (sleds in PLA because I didn’t have another colour at the time), no problems.
I recommend PETG as in case your rack got hot, PLA could sag – it has a glass transition temp of 50-80C.
Hello! I would like to ask, if there is any description about the fans wiring ? I’m from a Country, where I need to buy a different 12V plug, and I’m not sure about it.. Thanks!
Hi,
do you think you will make the Trays from the mark III project compatible with Raspberry Pi 5?
I attached a foto to show where it doesn’t fit. It would probably be possible to grind it down but I thought I’d ask before trying anything 🙂
also awesome work with the mark III. Using it for a raspberry kubernetes Cluster